Taking examination-quality photographs of shoe impressions
Photographing shoe impressions at crime scenes can be a little tricky, but with practice, you can take excellent examination-quality (eq) images of your footwear evidence.
EQ images are needed by footwear examiners to properly conduct an examination of the shoe print and the shoe it is being compared to. These photographs are sharp and completely in focus, photographed at the correct angle, properly composed and lit, and include the proper tools needed for the comparison process.
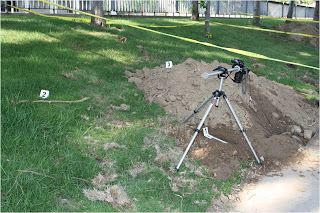 Start by taking overall photographs of the area where the impression(s) are located. If possible, show the impression(s) in relation to pertinent areas/items at the crime scene such as the window used to make entry into the house, (known as the point of entry or POE) or other items of evidence.
EQ impression photographs need to be taken as perpendicular (90 degrees)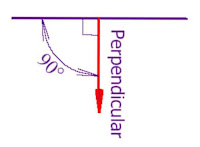 to the impression as possible. For this reason, always use a tripod to photograph shoe print evidence. Many excellent tripods are available, but I suggest a model
 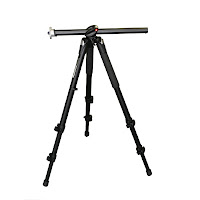 that allows the center column to reverse or fold horizontally or a model the accepts a horizontal adapter.
to the impression as possible. For this reason, always use a tripod to photograph shoe print evidence. Many excellent tripods are available, but I suggest a model that allows the center column to reverse or fold horizontally or a model the accepts a horizontal adapter. Use an angle finder to determine the angle of the impression, then 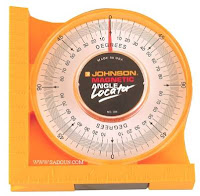 match the angle to the front surface of the lens. Now you have your optimum 90 degree shooting angle set.
match the angle to the front surface of the lens. Now you have your optimum 90 degree shooting angle set.Frame the shoe print tightly, but leave sufficient room for a scale, north direction indicator and your evidence marker. It is very important to have your scale at the same depth as  your impression. Carefully clear material away
 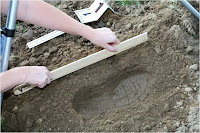 down to the depth of the impression and place your scale alongside the impression. Set your camera in the manual focus mode and focus your lens at the bottom of the shoe impression where the detail is located.
your impression. Carefully clear material away Now you are ready to light your impression in a way that will allow you to capture maximum detail. This is done with what is known as oblique lighting. Shade your shoe impression from direct sunlight and use you flash to light your impression from a low, or oblique, angle. You must create 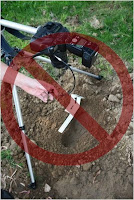 contrast (highlights and shadows) with your flash to record the detail of three-dimensional impressions. You can not do this with your flash on your camera. Use a flash extender, both wired and wireless are available, to
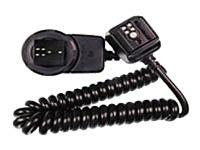 use your flash off-camera and still maintain communication between your camera and flash.
contrast (highlights and shadows) with your flash to record the detail of three-dimensional impressions. You can not do this with your flash on your camera. Use a flash extender, both wired and wireless are available, to use your flash off-camera and still maintain communication between your camera and flash.Angle your flash so the light "skims" across the impression causing highlights and shadows. Deeper impressions require a higher flash angle, shallow impressions require a lower or more oblique flash angle.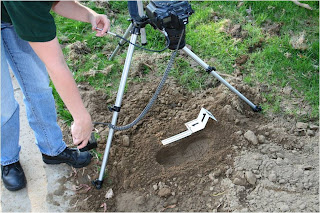
Use your flashlight to help find your starting angle. Use your camera’s LCD screen to fine tune and check your framing. 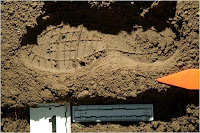 Shoot with your flash pointing from a minimum of four sides of the impression. This will insure you show the detail of all areas of the shoe impression.
Shoot with your flash pointing from a minimum of four sides of the impression. This will insure you show the detail of all areas of the shoe impression. Use an aperture opening that will capture the entire impression in focus. This is called using a large depth-of-field*. An f/stop setting between f11 and f22 should be sufficient.
Use your camera's histogram* to check the exposure of your digital image.
 *Check back for more Mini Tutorials on topics including depth-of-field and camera histograms.


This comment has been removed by the author.
ReplyDeleteThe guys on CSI should read this !!
ReplyDeleteHaving worked in the field, handling images made by Scenes Examiners, I can tell you that this simple tutorial may even be beyond the comprehension of some. Ther are plenty at work (or there were back in 2000) who can't even focus a camera, let alone get a flash exposure within four stops (try printing that for court!), so the finer points of lighting technique may well be a long way off...
ReplyDeleteJust saying. I actually thought it was a very well written tutorial and should be of use to many in this line of work.
That's what cracked me up about shows like CSI, well first they always use a flashlight, even outside at noon in Miami or Las Vegas...second is the popup flash on the DSLRs...of and the focus beeps! Yes I know it's a TV show, but that's still funny.
ReplyDeleteGreat little tutorial. As mentioned by a previous poster, this will be beyond the skills of most of my guys. I've resorted to the following as a basic primer for 90% of indoor overall scene photography...ISO 400, shutter at 1/125th, f8 and flash on TTL. This way, the flash does the math for them, the exposure is usually on target, and if they need to add or remove exposure, its done from the flash with the + or - button on the SB 800. I find most of my people can keep this straight. It's not that they're not capable, they just don't have the time to care about the photography.
ReplyDeleteSo you make compromises and try and acheive a balance, right?
Man you keep amazing me! thanks for all your great posts, hope to keep enjoying them for a long time to come. Happy new year for you and your family
ReplyDeleteVincent
Try climbing inside a jet engine exhaust to take a photo of a hairline crack One hand focussing, your chin grasping the metz potato masher the other hand holding on for dear life.
ReplyDeleteThe worst part all the images on the card have to be printed in order (absolutely no deletion) so the court gets to see all your misfires.
It is the most cringeworthy experience of your life. Believe me.
This is a funny post to me because this is exactly how I got into photography! Started out with film cameras and off camera bracketed and ring flashes taking pictures of dead bodies and shoe prints and window sills...but this is where it all started! I've seen some things man...and some stuff...haha. Don't ask me about "gloving"...ewwwwwwww.
ReplyDeleteFor some, this seems simple. For others they are still trying to figure out what a tripod is for. I have a 21 year law enforcement job that interupted my photography career and this is simple for the rookies to understand. Nice write up. As for the post before mine about dead bodies and gloving, thank God no one has a camera that can capture smell!
ReplyDeleteSmells?
ReplyDeleteDead guy, in the trunk of car for 2 weeks over summer...
I can still TASTE that!
Wow. It is frightening that a vast number of the people who must take forensic photographs have difficulty understanding this tutorial, much less applying it. Photographic evidence can mean the difference between acquittal and conviction; and it is often taken by someone incompetent to do so?! I am a fine artist and commercial textiles designer, and even I understand all of the above perfectly- it is an extremely "dumbed-down" step-by-step, actually.
ReplyDeleteI am astonished that it is not a concrete requirement that all forensic process officers be proficient in photographic procedure and principles.
I am quite glad to know you are helping educate those who need it.
I always knew CSI (the show) did a horrible job of taking photos.
ReplyDeleteThis only makes me more angry at to how unrealistic those shows are.
Here's an example of scary ineptness.
ReplyDeletePhotographer comes and takes photos of a shoe impression.
We match the impression with a pair of shoes discovered in a search.
Something doesn't look right, so I take a ruler to the scale in the photo.
The scale was 1.3x larger than my ruler.
The photographer had accidentially enlarged the photo.
Reading these posts, I'm stunned to hear that crime scene photographers have such little photography experience. This seems like a perfectly good tutorial that covers all the bases of getting full topography out of any piece of evidence including things I wouldn't have thought of.
ReplyDeleteWhere do I apply for crime scene photography?
And, to the commenter right above me who I hadn't read yet. The scale is there precisely because the photo could be printed at any size. If you want to blow it up for more detail, you can still see what the size is.
ReplyDeleteI applied for a crime scene photographer role. I didn't quite get it but was the only one at interview stage who got full marks in the theory test. I was amazed to learn that some photographers use the pop up flash on their DSLRs when shooting close up even though it causes a shadow on the image cast by the lens. I think a lot of people that end up photographing a crime scene are regular scene of crime officers trained in the basics of using a camera. I don't think there's enough money to employ enough highly skilled photogrpahers.
ReplyDeleteWow. It's been said before but it's hard to believe this would be a tough tutorial for those employed in forensic evidence gathering. Scary.
ReplyDeleteNow I just need to get my local PD to hire me.
I always laugh when I watch CSI and they have a ring flash on their cameras for photographing footprints. No shadow No footprint. Great tutorial.
ReplyDeleteI have considered getting in to this type of photography. How does one go about getting in to this? Where can I find more information regarding this career?
ReplyDeleteBrad curtright
www.totalimages.net